If you build a pushbutton into your circuit, sooner or later you will encounter that it sends a signal more than once. This behavior is called “bouncing”.
In the tutorial Arduino Lektion 33: Taster mit Pull Down Widerstand I already explained how to build a small circuit with a push button and a pull down resistor. However, this circuit has exactly the described problem, if you press the button and immediately release it again more than one signal is sent.
Resources required
If you want to build the following example, then you need:
- Arduino UNO R3*,
- USB Cable*,
- button for Breadboard connection*,
- 10 kOhm Resistor*,
- breadboard wires*, 10 cm, male – male,
- breadboard*
Note from me: The links marked with an asterisk (*) are affiliate links. If you make a purchase through these links, I will receive a small commission to help support this blog. The price for you remains unchanged. Thank you for your support!
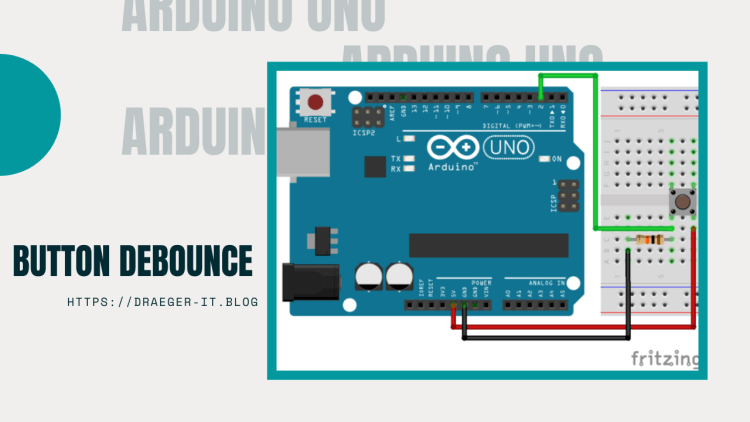
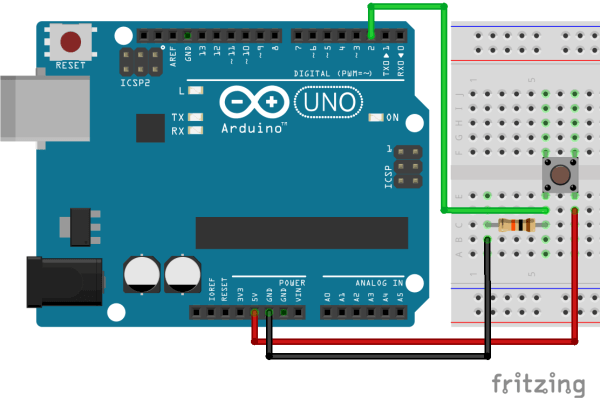
Circuit – button with pull down resistor at Arduino UNO
Sample code with bouncing button
const int btnUp = 2; //Button connected at digital Pin D2
int statusBtnUp = 0; //Field for storage the state
int index = 0; // counter
void setup() {
  Serial.begin(9600); //Begin of serial communication with 9600 baud
  pinMode(btnUp,INPUT); //set button pin as input
}
void loop() {
  //if the button was pressed then...
  if(digitalRead(btnUp) == HIGH){
    //increment the index
    index = index+1;
    //print the value to the serial interface
    Serial.println(index);
  }
}
Solution with Bounce2 library
Here the Bounce2 library helps, this library contains functionalities which suppress exactly this “bouncing” of buttons. (How to install a library of the Arduino IDE I have already explained in detail in the tutorial Arduino IDE, Einbinden einer Bibliothek).

If the library has been successfully installed, then it must be added to the Sketch via the command “#include “.
First of all, an instance of “Bounce” must be created for each button. In the constructor of the Bounce object the pin to which the button is connected and additionally a value for a pause (in milliseconds) is passed.
//include library
#include <Bounce2.h>

//define field for button pin
//in my case the button is attachted to digital pin 2
#define BTN 2

//create a instance from button with pin and a delay of 50 ms.
Bounce btnBouncer = Bounce(BTN, 50);
In the “setup” function, the pinMode for the buttons must be set to Input as before.
//define that the button pin works as input
pinMode(BTN, INPUT);
The function “loop” must be rewritten significantly, because we now use the commands and functions from the Bounce2 library.
In the first step we have to update the button.
//update the button
btnBouncer.update();
To check afterwards whether the button has been pressed.
//if the button was pressed, then...
if(btnBouncer.fell()){
  //increment the index field
  index = index+1;
  //print the value to the serial interface
  Serial.println(index);
}
If you want to check whether the button has been released again, use the “rose” function.
Code – Button with Bounce2 lib without bouncing
Here now the whole sketch to rebuild and test yourself.
#include <Bounce2.h>
#define BTN 2
int index = 0;
Bounce btnBouncer = Bounce(BTN, 50);
void setup() {
  Serial.begin(9600);
  pinMode(BTN, INPUT);

  digitalWrite(BTN, HIGH);
}
void loop() {
  btnBouncer.update();
  if(btnBouncer.fell()){
    index = index+1;
    Serial.println(index);
  }

}
Letzte Aktualisierung am: 10. March 2024