Let’s take a look at how the Shelly Plus 1 Mini can be integrated into an existing home network. Thanks to the existing Bluetooth interface, this is much easier (and above all less stressful) than with the previous models and can therefore be done in just a few seconds.

I have already introduced you to the Shelly Plus 1 Mini in the article Compact and Versatile: Introducing the Shelly Plus 1 Mini, here I will only be looking at how you can integrate it into your home network and set up a small circuit with it.
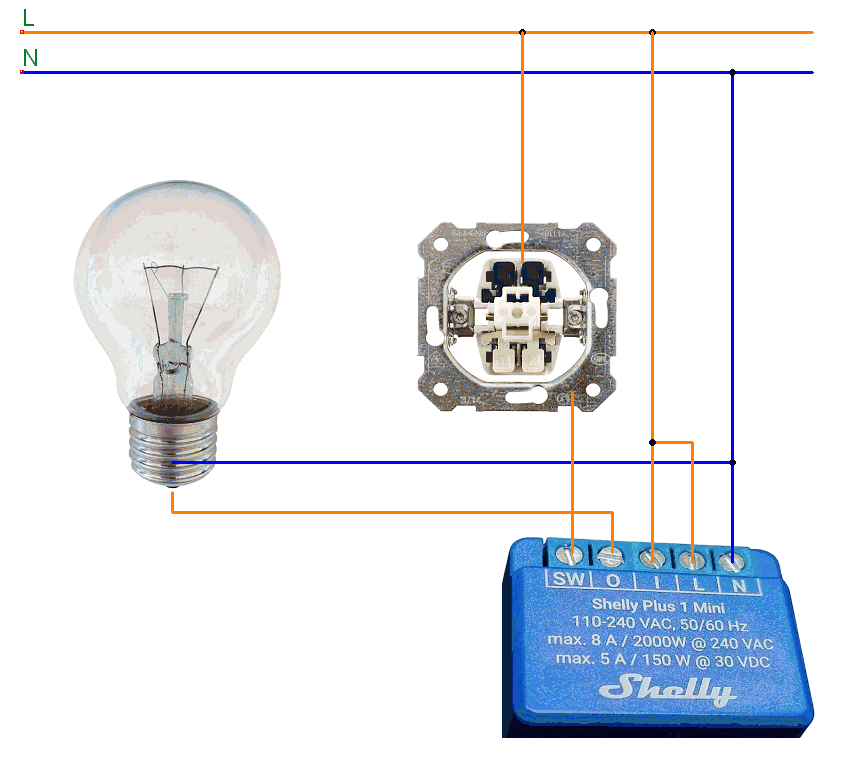
A small setup with the Shelly Plus 1 Mini and a lamp
In the following, I would like to show you how to integrate the Shelly Plus 1 Mini into an existing network and switch a lamp with it.

For the assembly I need:
- one Shelly Plus 1 Mini*,
- two Wagoklemmen*,
- two approx. 10 cm long brown cables,
- one blue cable approx. 10 cm long
- one Schuko plug*,
- approx. 1.5 m 3×1.5 mm cable (flexible),
- wire end ferrules & suitable pliers,
- a small screwdriver,
- a 2-pole phase tester
Note from me: The links marked with an asterisk (*) are affiliate links. If you make a purchase through these links, I will receive a small commission to help support this blog. The price for you remains unchanged. Thank you for your support!
Alternatively, you can get the cable, supply line and the Schuko plug cheaply from local DIY stores such as Toom, Bauking, Hellweg, Obi etc., so I won’t link them here.
Safety regulations for handling high voltages
In my case, I have connected the Shelly Plus 1 Mini to 230V alternating current. If you want to rebuild this, please follow the safety instructions below for handling high voltages.
- Safety first: Electricity can be dangerous. Pay attention to your safety and that of others.
- Switch off the power: Switch off the power before working on electrical equipment.
- Use insulation: Use insulated tools and do not touch bare wires.
- Dry hands: Only work on electrical equipment with dry hands.
- Keep children away: Keep children away from power sources to prevent accidents.
- Professional help: If you are unsure or the work is complex, get expert help.
Layout of the circuit – Shelly Plus 1 Mini with lamp & switch
Let’s now set up the circuit and start by connecting a lamp. Below you will find the connection diagram, which I have supplemented with an additional switch connected to SW.
Integrating the Shelly Plus 1 Mini into a home network
Once the circuit has been set up, this little Shelly can be integrated into the home network. The two wireless features (Bluetooth & 2.4 GHz WiFi) offer two ways to do this.
To utilise the full range of functions, I recommend the Shelly Smart Control app, which is available for iOS and Android in the respective stores.


Integration via Bluetooth
The easiest way is via Bluetooth, here you just have to search for Bluetooth devices in the Shelly Smart Control app. (In my case, I had to set the filter to ‘All devices’.) The Shelly 1 Mini is then displayed after a short time. Now we can add it, whereby we first configure the WiFi network. Once this has been done, the detailed view opens immediately.


Integration via WLAN
The Shelly Plus 1 Mini can be set up like any other Shelly via WiFi. To do this, you first connect to the device’s access point and can then configure the local 2.4 GHz WiFi network via a web interface. Once this is done, you switch back to the Shelly Smart Control app and can then add the device there as usual. (In my case, I have several Fritz! repeaters in use, so I have several 2.4 GHz networks available).


Letzte Aktualisierung am: 31. May 2024