🍪 Privacy & Transparency

We and our partners use cookies to Store and/or access information on a device. We and our partners use data for Personalised ads and content, ad and content measurement, audience insights and product development. An example of data being processed may be a unique identifier stored in a cookie. Some of our partners may process your data as a part of their legitimate business interest without asking for consent. To view the purposes they believe they have legitimate interest for, or to object to this data processing use the vendor list link below. The consent submitted will only be used for data processing originating from this website. If you would like to change your settings or withdraw consent at any time, the link to do so is in our privacy policy accessible from our home page..

Vendor List | Privacy Policy
Skip to content

Technik Blog

Programmieren | Arduino | ESP32 | MicroPython | Python | Raspberry PI

Menu
  • About me
  • Contact
  • DeutschDeutsch
  • EnglishEnglish
Menu

Use Arduino IDE again: Release your microcontroller from MicroPython

Posted on 18. August 202315. August 2023 by Stefan Draeger

In the article PProgrammieren des Arduino Nano ESP32 im Arduino Lab I showed you how to flash the Arduino Nano ESP32 for MicroPython using the MicroPython Installer. Here I will show you how to undo the flashing and how to program your microcontroller in the Arduino IDE again.

There is an official english documentation under Reset the Arduino bootloader on the Nano ESP32, which I refer to here. You can find the German instructions here.

What is needed to reset the microcontroller?

You only need additionally

  • a 400 pin breadboard,
  • a breadboard cable, 10 cm, male-male

And of course the Arduino IDE. In my case I use version 2.1.1 which you can download for free at https://www.arduino.cc/en/software for Microsoft Windows, Linux and macOS.

Structure of the small circuit

Let’s build the circuit first and clamp the breadboard cable between pin GND & B1 from the board.

Arduino Nano ESP32 with bridge between GND & B1

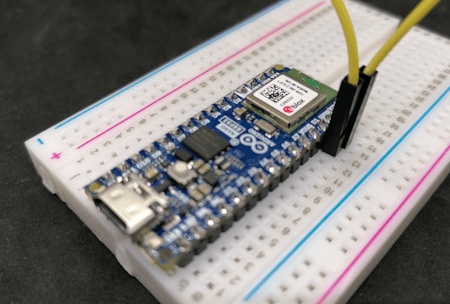
The next step is to connect the microcontroller to the PC and press the RESET button. If this was done, then the bridge with the breadboard cable can be disconnected again and the RGB LED should now change from green to purple. Now we can switch to the Arduino IDE.

Reset via the Arduino IDE

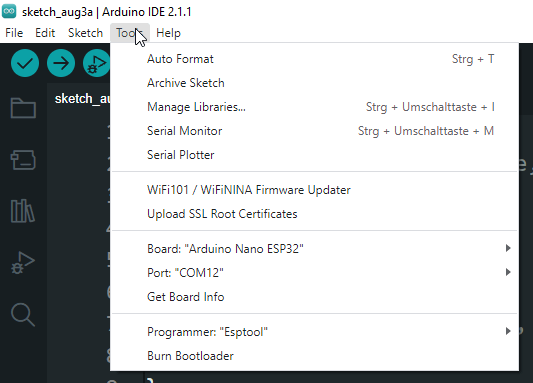
First we make sure that the correct microcontroller “Arduino Nano ESP32” and the COM port are selected. Additionally, the entry “EspTools” must be checked under Tools > Programmer.

Settings for resetting the microcontroller

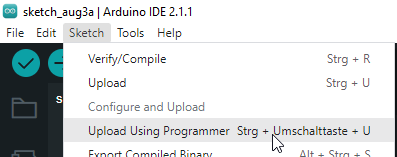
Once these settings are made, we can start an empty Sketch via Sketch > “Upload using Programmer”.

Arduino IDE - Upload a sketch with a selected programmer
Arduino IDE – Upload a sketch with a selected programmer

As soon as the following text is displayed, we can restart the microcontroller via the RESET button and the process is finished.

Leaving...
Hard resetting via RTS pin...

Now you can program your Arduino Nano ESP32 again as usual via the Arduino IDE.

Leave a Reply Cancel reply

Your email address will not be published. Required fields are marked *

Categories

  • Sponsored Contribution Guidelines

Meta

  • Videothek
  • Impressum
  • Datenschutzerklärung
  • Disclaimer
  • Kontakt
  • Cookie-Richtlinie (EU)

Links

Blogverzeichnis Bloggerei.de Blogverzeichnis TopBlogs.de das Original - Blogverzeichnis | Blog Top Liste Blogverzeichnis trusted-blogs.com
©2023 Technik Blog | Built using WordPress and Responsive Blogily theme by Superb