This post is all about efficient timer programming for Arduino. Timer controlled functions play an important role in many Arduino projects, be it for precise timing or recurring tasks. I’ll show you how to use the external “timer” library to elegantly overcome these challenges. Discover an improved solution compared to traditional approaches and learn how to enrich your Arduino projects with the right time intervals. For additional support, you’ll also find a step-by-step tutorial video to help you get started.
In the German contribution Arduino: Ein Sketch ohne delay(ms) schreiben I had already shown you a solution how you can execute a program section without the function call “delay”. Here I would like to pick up these ideas and show you another solution.

Taking a break with board resources
First I would like to show you again how you can insert a small break in your program with the board means of the Arduino IDE and/or the language.
delay
Probably the simplest form is the call of the function delay. Here the entire microcontroller takes a pause. When the pause has expired, the program continues to be executed. However, no further action can be executed during this pause.
void setup() {
  //start serial communication from 9600 baud
  Serial.begin(9600);
}

void loop() {
  //output the milliseconds that have passed so far
  Serial.println(millis());
  //insert a pause of 500 milliseconds
  delay(500);
}
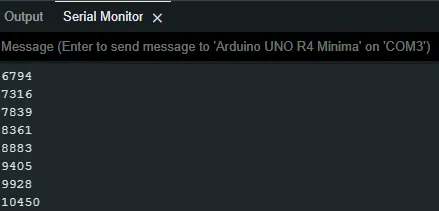
If we run this little program once, we see that the pause is usually a bit longer than the targeted 500 milliseconds.
millis()
Another possibility is to take the past milliseconds (function millis()) and use them for a small calculation. Here it is checked whether the past milliseconds + a pause continuously, whether this is smaller than the current milliseconds. If so, then the function is to be executed.
//Constant with the integer value of the pause
const int PAUSE = 500;
//Field to store the timestamp of the last execution
long lastAction = 0;

void setup() {
  //start serial communication from 9600 baud
  Serial.begin(9600);
}

void loop() {
  //If the time of the last execution + the pause
  //is smaller than the current return value of the function
  //millis(), then...
  if ((lastAction + PAUSE) < millis()) {
    //save the current value of the function millis()
    lastAction = millis();
    //output the milliseconds that have passed so far
    Serial.println(millis());
  }
}
The values in the serial monitor are now much more accurate than with the function call of delay:

Modulo
I found a third approach on the page https://starthardware.org/timer-mit-arduino-alternative-zu-delays/. There a third equally very interesting approach is shown, namely with the calculation with modulo.
Modulo is a mathematical operation similar to addition or multiplication. This operation plays a significant role in various encryption procedures as well as key exchange procedures. The result of modulo, often abbreviated as “mod”, denotes the remainder of an integer division.
//Constant with the integer value of the pause
const int PAUSE = 500;

void setup() {
  //start serial communication from 9600 baud
  Serial.begin(9600);
}

void loop() {
  //divide the current value of the past milliseconds, since which
  //the microcontroller started by 1000 and take from that
  //take the integer remainder
  long calcMod = millis() % 1000;
  //If this value is greater than the desired pause, then....
  if (calcMod > PAUSE) {
    //output the milliseconds that have passed so far
    Serial.print(millis());
    //output the calculated value
    Serial.print(" [");
    Serial.print(calcMod);
    Serial.println("]");
  }
}
If we look closely at the output, whenever the remainder is greater than 500, the output is executed on the serial port.
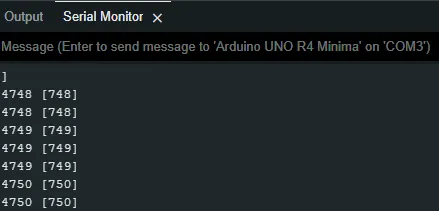
So we have a pause of 500 milliseconds, this is sufficient for LEDs etc., but if we run a serial output like here, then we get too many values.
Lean with the timer library from Arduino
But it is also possible to do it more slim and precise, here the timer library of Arduino is used. You can download it in version 3.0.0 from https://www.arduino.cc/reference/en/libraries/arduino-timer/ as a ZIP file.
How to integrate a library as a ZIP file into the Arduino IDE, I have already explained in detail in the german article Arduino IDE, Einbinden einer Bibliothek.
//Arduino Timer Library
#include <arduino-timer.h>

//Timer object initialize
Timer timer = timer_create_default();

//Function to output the milliseconds
//Parameter is undefined
bool printMillis(void *){
  Serial.println(millis());
  //Returns true if the timer is to be continued,
  //otherwise false.
  return true;
}

void setup() {
  //start serial communication with 9600 baud
  Serial.begin(9600);
  //configure the timer,
  //the function "printMillis" should be executed every 500 milliseconds
  //be executed.
  timer.every(500, printMillis);
}

void loop() {
  //Makes the timer run forward
  timer.tick();
}
If we now look at the output, we see that the pause here is exactly 500 milliseconds.

So if you need an explicit pause, I would recommend you to use the Time library.
Download
Here you can find all of these examples as zip-file:
Conclusion
In conclusion, there are significant advantages to using the “Timer” library for Arduino. The precise interval of execution allows for more accurate timing while maintaining code efficiency. With this streamlined solution, we can say goodbye to the traditional approaches, such as using delay, and take our projects to a new level. Discover the fascination of Arduino timer programming and experience the accuracy your projects deserve.
Letzte Aktualisierung am: 08. January 2026